Saturday, 29 March 2014

Blogging Break

Hey guys!

Hope you are all good!

I am going to take a little break from blogging everyday for the next week. Sadly, my lovely grandad passed away last night. Therefore, I will be spending a lot of time with my family and travelling back & forth to see my granny who lives over two hours away from the city I live in.

I just wanted to let you know why I had stopped blogging and tweeting. I probably won't be uploading any new videos to YouTube this week either. However, I shall be back soon!

Enjoy your weekend! I shall leave you this photo of my very cool grandad, who lived to the amazing age of 91, with his ice cream horse & cart! 

Thursday, 27 March 2014

Fav Polish Posts #5 OPI Black Shatter Polish


Ooh so this OPI Black Shatter Polish is definitely one of my favourite polish discoveries. I posted about this polish in July last year. I have just had some inspiration about what to do with this polish next!.....

Ok so I know that crackle and shatter nail polish has been around for ages and ages but I found this little gem hidden away. I got OPI's Black Shatter polish last year but for some weird reason tried it once and wasn't very impressed. I have no idea why because when I tried it last week I absolutely loved it. I'm very excited about the awesome nail looks that I can create with it. 

I have tried it over pink and over multicoloured nails and I think it looks great. I really do! Not only that, it is so easy to apply and works so quickly it's great. The polish glides on really smoothly and the brush is really good. My top tip for applying this polish is to make sure that you don't put too much onto your nail. If you feel you haven't applied enough polish you can add a little bit more and again it glides on effortlessly. No one would be able to tell that you had touched up areas where you wanted a bit more shatter.

I am looking forward to trying this polish over tie dye nails and neon polishes. 

I would really recommend this polish, especially for anyone who has not tried shatter/crackle polish before.

Do you like shatter/crackle effect nail polish? If so, what colours do you wear it over?


Wednesday, 26 March 2014

Fav Polish Posts #4 Barry M's Gelly Hi-shine Polish: Grapefruit


Hey guys! It's no secret that I love Barry M's Gelly Hi-Shine polishes. I can't wait to get my hands on the new spring/summer 2014 shades! So, here is a post from last summer about one of Barry M's gorgeous polishes:).....

Summer seems to have finally arrived and its making me lust after red, orange and pink shades of polish. So, I couldn't resist adding a few more Barry M Gelly Hi-Shine polishes to my collection. I purchased Barry M's Grapefruit Gelly Hi-Shine polish which is an awesome vibrant pink shade. I think it looks great on your nails. I cannot wait to wear it with some glitter over it. Maybe with Loreal's Confetti polish!  I really can't praise Barry M enough for creating these polishes. I think they are brilliant in so many ways and they have convinced me to try out colours that I wouldn't have tried before.

What do you think of this colour? What is your favourite Gelly Hi-Shine polish?


Tuesday, 25 March 2014

Fav Polish Posts #3 Maybelline Forever Strong Polish


Hey guys! This polish really surprised me as it was just so nice. It led to me buying more of the gorgeous polishes from this range. Here it is in all its glory....

I was raiding my Mum's nail polish box again and I came across Maybelline's Forever Strong Super Stay Gel polish in Bubble Gum. This is a pretty pink polish (my Mum is obsessed with pink polish) with very subtle metallic tones in it which you only really see in the light. I really like the formula of this polish. I think it actually rivals my beloved Barry M Gelly Hi-Shine polishes. I don't know why people don't rave about this polish more often. I hadn't realised that this range of polish is actually Gel polish. I think this is why their formula is so great. You only need two coats and your nails are perfect. The polishes applies really well and the brush is really great. Its almost like the new Essie brushes. This polish dries fairly quickly too. I really would like to try out a couple of their other colours seeing as I have been so impressed.

Have your tried this polish before? What colour of polish from this range do you like the best?


Monday, 24 March 2014

Fav Polish Posts #2 Rimmel Salon Pro Polish: Ultra Violet


Here is my second favourite polish post from the last year. It is too lovely not to show you again! I published this post way back in August and I still absolutely adore this gorgeous polish!......

I'm rather excited about this review just because I LOVE this polish so much. I recently purchased Rimmel's Salon Pro nail polish in Ultra Violet which is such a gorgeous colour. When I bought this polish i didn't have many polishes this colour so I hardly had it off of my nails. This polish impressed me so much. It has an amazing wide brush which makes application easy and the formula is so great. As it is gel-like it provides such good coverage. Two coats of polish and your nails are perfect. I found that this polish lasts a long time on your nails and almost has a rubber quality about it which means it doesn't chip like normal polishes. This is totally out of character for me but I wore it without topcoat for a week and it lasted so well. So, if you hate wearing topcoat these might be the polishes for you. I wouldn't recommend not wearing a top coat though! I found that it dried fairly quickly too. 

I really think these polishes are worth a try! I am rather obsessed with them at the moment. 

Have you tried these polishes? What do you think of them?


Would You Rather Beauty Tag Video

I've got a brand new video up today and its on the "would you rather" tag.

This tag was so fun to do especially as a video! The lovely Laura from http://lauralikesbeauty.blogspot.co.uk/?m=1 tagged me to do this tag. Go and check out her great blog now guys!:) thanks again for tagging me Laura!

If any of you want to do this tag you should go for it and let us know when you have!:)


Sunday, 23 March 2014

Fav Polish Posts #1 Barry M Black Croc Effect Polish


Hey guys!

This week I will be doing a series showing you what are in my opinion some of the best polishes that I have posted about in the last year. I posted about Barry M's Black Croc Effect polish at the beginning of July last year and I love it so much that I thought I would post about it for those who didn't know about my blog in July......

I know that Barry M Black Croc Effects nail polish has been around for ages but I thought I would give it a try seeing as it is so reasonably priced and I have been more experimental with my nails recently. I am really glad I did - I was really impressed by this polish. You paint a thin layer of this over a other colour of polish and boom an amazing pattern appears. I found this polish so easy to apply, it literally glides on. The thinner the coat of this polish that you paint on the more detailed the pattern turns out. It is really quite amazing as it does look like croc.

I used this polish over orange, red and white polish. I think it looks really stunning over white. I would highly recommend this polish if you like the pattern.

let me know what your thoughts are on these photos please? Would love to know!


Friday, 21 March 2014

Flashback #7 Rainbow Leopard Nail Art


I tried out Rainbow Leopard Print Nail Art way back when I first started blogging and as summer is only a few months away I thought I would show you this post again.......

I had been looking forward to creating some rainbow leopard print nails for a while but had just never had the time. Finally, I tried it out and I absolutely love them. They are so pretty and bold in just the right way. I really want to try heaps of nail designs involving rainbow now or ombré! I think rainbow may be my new addiction!

Things you will need :- base coat, white polish, a selection of polishes of your choice, make up sponges, a black nail art pen/brush and a top coat.

Here is a step by step guide as to how I accomplished my awesome rainbow leopard print nails:

1)Apply base coat.

2)Paint two coats of white polish onto your nails and leave to dry for a good 45 minutes-if you don't leave the polish to dry for long enough it will be pulled off when you dab on your coloured polish with a sponge and will look messy-I learned this the hard way!

3)Use your make up sponges to dab on your rainbow colours (I cut my sponges up into small bits and held them in between my fingers to apply the polish as well as placing the sponge between tweezers).

4)Blend each colour into the next with the sponge. Sometimes I added a hint of white polish to help the colours blend more easily. I had attempted to paint all of the colours onto one full sized make up sponge and gently transfer the polish onto my nails but I found that this did not work as well. I also found that the make up sponges that I originally used didn't work very well as they would pull the polish off of the nail. I then switched to a different type of make up sponge which created better results. You could also use eye shadow applicators.

5)Once your rainbow background is dry gently paint your leopard print pattern onto your nails using your black nail art pen/brush. 

6)Leave your leopard pattern to dry before gently applying your top coat so as not to smudge your black leopard print.

I found that this design took me a while as it was my first attempt ever but I'm sure that practice makes perfect and next time it won't take as long. 

I'd love to hear if any of you have tried rainbow nails?:)


Flashback #6 Ciate Colourfoil Manicure


I was looking back at my old blog post photos and I came across the ones from my Ciate Colourfoil Manicure post. You can get such a cool look with this foil I must dig my set out ASAP!......

When I came across Ciate's Colourfoil Manicure set I knew I would love to try it out. It was totally my kinda thing - sparkly foil which you can apply anywhere on your nail - so arty and amazing I could have squealed!

This product is beautifully packaged as like all Ciate products. The set includes a full size bottle of polish, a good number of sheets of foil, glue to stick the foil to your nails and a swatch wheel.  

My first attempt at trying this out did not go very well as I tried to stick the wrong side of the foil to my nail. Also, I had not waited long enough for the nail polish to dry which resulted in me pulling all of the polish off of my nail leaving a horrible mess. 

My top tip is to leave your polish to dry for an hour or two before you attempt to create your work of art with the foil. Make sure that you place the foil the correct way down and only use a very light layer of the glue because if you use too much it becomes very messy and does not turn out as well as it could do. You really can create some amazing sparkly designs. 

I would also advise that when you put a top coat on to do it as gently as possible and try not to drag the brush over the foil as the colours of the foil can smear. I felt that the top coat killed the sparkle of the foil a bit which is quite disappointing. 

Overall, I think the positives of this product outweigh the negatives. The Ciate Colourfoil set is pretty cool as you can create something very arty and unique in a fairly short time. It did not take me long to create cute nails at all and it wasn't a faff to do. 

This set was very much worth the £18.00 that I spent on it as I have not seen anything like it before. It was a total treat to myself. It would make a great birthday or Christmas present for a nail enthusiast.

Flashback #5 Double Leopard Print Nail Art


I wanted to show you this post which I originally published at the beginning of August 2013 because it is quite random but interesting. I was lucky that although this design didn't turn out the way I wanted it to it was not a complete messy disaster!.....

I really wanted to create a leopard print design using different colours. I tried to use the combination of purple leopard print outlined in pink on a white background. This was actually a bit of a disaster and looked rubbish. Therefore, the design that I ended up with was the result of an experiment gone wrong. I found that the leopard print really needed to be defined sharply and the pink polish I had used just didn't do that. So, I grabbed my trusty black Models Own nail art pen/brush and gave my leopard print some definition - including both the pink and purple polish in the leopard spots. 

So, what do you all think of my latest leopard print design? I would love to know!:)


Wednesday, 19 March 2014

Flashback #4 Ikat Nail Art Guide


My fourth flashback post is on my Ikat Nail Art Guide. I really love the Ikat design so I thought I would resurrect this post for you. I have included photos of my original attempt at it and my neon version too. I would like to try it out again with some different colours. Here is the post..........

Ikat nail art is quite simple to create but very effective. I took inspiration from all of the nail art photos and tutorials online. There are so many variations of this design and ways of creating it. I can't wait to try out the Ikat design in lots of different colours. Here is how I created my Ikat nails:

1)Apply base coat

2)Apply 2 coats of chosen base colour.

3)Using a dotting tool and some white polish create flame shapes on each nail. This will be for the base of your Ikat design.

4)Then use a different colour of polish on your dotting tool to place a flame like patch of polish in the middle of all of your white flame shapes. I used neon pink polish to do this.

5)Use your nail art brush/pen to create small and light brush strokes around your white flame shapes.

6)Then take your nail art brush/pen and create a small black curved flame shape inside your coloured flame shapes.

7)Leave to dry thoroughly and gently apply a top coat.

Please let me know if you have tried Ikat nail art or whether you are going to try it and what colours you have used!


Tuesday, 18 March 2014

Flashback #3: Swirl Nail Art Guide


Hey guys!

I have combined my Swirl Nail Art Guide with photos from my Sunshine Swirl Nail Art post. The nail art guide tells you exactly how I created this look so you can try it out. I thought I would show you my Sunshine Swirl Nail Art seeing as we have had pretty lovely weather in the UK over the last week or two. So, here is the guide......

Recently I have been discovering how many amazing nail art techniques there are out there and how many people are so talented at creating them. I thought I would share with you one really easy technique that I came across as I am fairly new to nail art and you might be too.

Polish swirl nail art is something I had never thought about before but is so fun, quick and simple to create. Here is a guide as to how I created it:

1)Apply base coat.

2)Paint each nail with one coat of white polish or a colour of your choice. This technique probably works with pale pastel colours too!

3)Paint each nail with a second coat of white polish.

4)Before the polish dries dab on two dabs of your first swirling colour and then two dabs of your second swirling colour. I dabbed the colours in a way that meant they were diagonally opposite one another.

5)Whilst the polish is wet use a cocktail stick to swirl the colours together in any way you want to. Here you may have to add a small dab of white polish to help add some more swirls to your design.

6)Leave to dry thoroughly and gently apply your top coat.

I would love to know what your thoughts are on this nail art technique!


Monday, 17 March 2014

Flashback #2 Fleck Nail Art Guide


My second Flashback post is on this pretty FleckNail Art that I created during summer 2013. I had forgotten that I had even tried this out. I will have to try it again soon with different colours!.......here's my Fleck Nail Art Guide......

I really wanted to create something different I terms of nail art so I got out my newly purchased nail art brushes and got to work. I really loved art way back when I was at school but didn't have much time for it when I was at uni doing a non-art related degree so creating art on my nails is such a good way to be artistic again. I've called this nail art design Fleck Nail Art because I really don't know how to describe it.

Here is a guide as to how I created it:

1)Apply base coat

2)Paint your nails with 2 coats of white polish and leave to dry

3)I chose 5 different polishes to create the flecks, using the lightest colour first and the darkest colour last

4)Dip your chosen nail art brush in to a blob of your first polish and paint flecks of the polish on each of your nails

5)Repeat this process with each of the polishes wiping off your brush before each colour change

6)Apply top coat and leave to dry

This nail art design looked so pretty in real life and was a nice change. It was really fun to do too and really is quite simple. It did not take me long to create at all.

Let me know if you try this nail design out too and what you think of it:)


Sunday, 16 March 2014

Flashback #1: Triple Mint Nail Art


Hey guys!

I hope you are all well! 

I have decided to do something that I have never done before and start a Flashback blog post series where I show you some of my favourite posts from the past. A lot of you won't have seen these posts because they are from last summer when few people knew about my blog. I hope you enjoy seeing some of my old posts! Here is the first post I have chosen on Triple Mint Nail Art........

So I really wanted to paint my nails with mint polish but I didn't want them to be one solid colour. I decided to use Essie's Mint Candy Apple and Barry M's Greenberry and Guava polishes to create a mottled mint nail design. I painted my nails with two coats of white polish and then dabbed on the three polishes to each nail with a make up sponge. I added more of each polish where necessary and to help blend the polishes so they were not too obviously splodged on. The end result looked really pretty although no matter where or how I photographed my nails did they look as nice as they did in real life which is a shame! It was easy and fun to do and I can't wait to try this technique with other colours. 

Have you ever tried out this technique?


Friday, 14 March 2014

New YouTube Video: Nail Art Tools

Hey guys!

My latest YouTube video is about the kind of nail art tools that I use on a regular basis to create all of my designs. A couple of you have asked me recently about the tools I use. So, I thought u would you show you all of the inexpensive things I use when I'm creating nail art, I hope you fin dot interesting and it gives you some ideas.

Here is the link to the video!:) I hope you like it!:) http://youtu.be/PwuqlhFzptA

Please let me know what you think!

NOTW: Multi-coloured Pastel Nails


This week I have been wearing these pretty pastel colours on my nails. I really needed to do my nails quickly so chose these pastel polishes from Bourjois and added some polka dots. I didn't have time to cover all of my nails in polka dots so I decided just to make feature nails out of the ones I applied the pattern to. 

What do you guys think of my quick design? Do you like the colour combination?


Thursday, 13 March 2014

Tanya Burr's Midnight Sparkles Polish


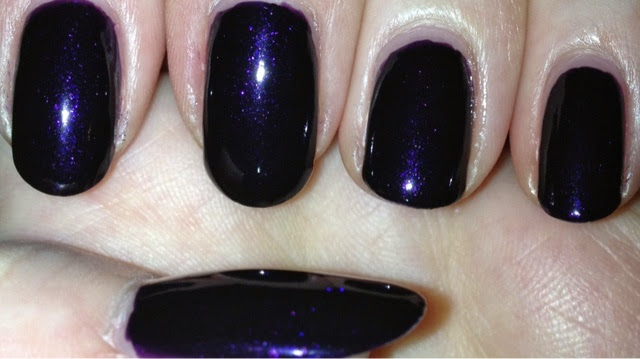
My final post in the Tanya Burr Nail Polish series is about Tanya's Midnight Sparkles Polish. I don't think that the photographs show you how pretty this polish is. I think it is a really really dark purple with a purple shimmer throughout. If you like having dark nail polish but do not want to wear plain black polish all the time this might be a good choice for you. It looks almost black on your nails with the purple shimmer catching the light nicely. 

Of course the formula is great and it applies smoothly with the perfect brush provided. I really like Tanya's polishes and I have explained all the great points about this polish in previous posts. They are just all round good polishes that I would definitely recommend trying out. 

What do you think of this polish? Do you like really dark polishes which have a bit of a shimmer through them?